marți, 8 iunie 2010

Photoshop Tutorial : Editing and replacing parts of a photo

Here's a cool tutorial for all you newbies out there :
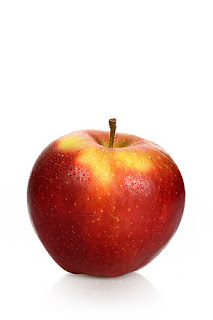
First , let's open this nice apple i found on the net . Right click it and save it somewhere you can remember on your computer.
How do you open it in Photoshop ?
Just double click the photoshop icon , and once it's done loading and you're in the menu. Just do like i do :
Browse till you find the image , and click Open .
Now that you have it in your Photoshop space , right-click the fourth icon down on your tool bar and after that , left click the Magic Wand . After, just left click once the white space on the photo ( the white background of the apple ).
Once it's selected you can either drag new images from your Photoshop space on that one , and they will appear only on your selection , or you can use the Brush Tool to paint that area . It's all up to your imagination.

Photoshop Tutorial : Tools in Adobe Photoshop

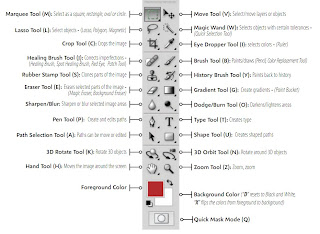
I have put together a little tutorial about all the tools that are available in Photoshop. To work your way around all the tutorials on the internet , you have to know at least just a little bit about the tools you're going to use .
Make sure you click on the image to see it HD.


Here is a small description that i wrote for the most important ones that we'll use :
  • Marquee Tool(M): Create a new document and basically just keep pressing left click on your mouse on the document space to draw a square . Everything inside the square you just draw will be selected.
  • Lasso Tool(L): Use this tool to select parts/objects in your current layer.
  • Crop Tool(C): This basically crops the part you select.
  • Healing Brush Tool(J): You will be using this tool mostly to correct and edit imperfections on a photo , like spots on the skin , pimples etc.
  • Eraser Tool(E): Erases parts from the current layer and makes them transparent.
  • Pen Tool(P): Very useful tool.It's one of the most used tools by a professional designer.
  • Zoom Tool(Z): Basically just zooms on the image.We'll use this alot to make sure all the details are perfect.
  • Brush Tool(B): Freestyle painting on the layer using different colors.
  • Foreground Color: Select the main color , to use it with different tools.

Photoshop Tutorial : Layers

Layers are one of the most basic things you should learn , when begining to learn Photoshop. Think about layers as simple images stacked on top of another. Most of the cool images you see out there are the result of hours of intense photoshop work and many many layers .

For example :
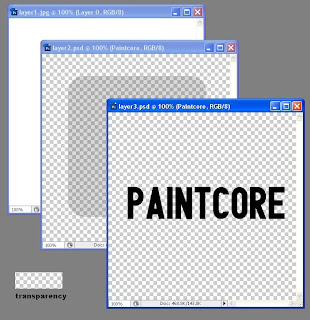
The next image has been made from 3 layers !


Here are the 3 layers :


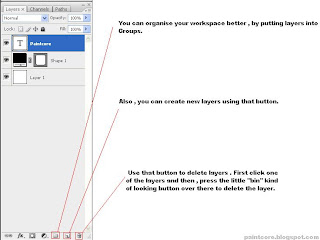
You can find these layers in the Photoshop menu , right bottom corner :

Click this image to zoom .

You will need to know only of these 3 buttons for now.Also , take note , that layers act as single standalone images. If the layers don't have a transparent background they will simply overlay and only the last layer will appear.
Related Posts Plugin for WordPress, Blogger...