duminică, 5 decembrie 2010

Photoshop Tutorial : How to correct very bright / too dark pictures

Here's a simple tutorial about correcting underexposed / overexposed pictures using Adobe Photoshop. Let's say that your camera didn't do well on your last photography session. Just open the picture you want to edit in Photoshop using CTRL + O / File --> Open . Correcting this type of photos is just a simple matter of changing the blending mode of simillar layers.

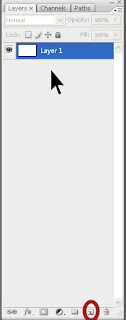
After you got the picture opened in Photoshop , you have to duplicate the background . Just drag the layer with your photo onto the Add a new layer button.

OK ! Once you've duplicated the layer with your photo , you have to know what's wrong with your photo . If it's too bright , first select the new duplicated layer you have created , go to the Blending Mode drop down menu , and select Multiply . Wow ! Awesome , right ? If it's way too dark , you have to change the blending mode from normal , to Overlay .

How do you go to the blending mode menu ? It's right on top of your Layer Menu !!
Click the next photo to see where it's located.
Here are a few examples of photos edited using this very method
( Please click the images to see them with decent quality )


Well , i hope you liked it ! See you on my next tutorial :)

Photoshop Tutorial : How to correct the orientation of a photo

This is a tutorial used to correct the orientation of your photo . So you took a few pictures , but on the photo that you liked most , the photographer rotated the camera a little bit , just enough to ruin it. Don't worry ! There's a simple way to correct this in Photoshop !

First , let me give you an example of what i am talking about :
Ok , in this tutorial , i am going to use those 2 photos you've seen few seconds ago.This is the original picture.

Open it in your Photoshop , using CTRL + O or File -> Open . After you got it in your work space , we have to use the Ruler Tool . This ia a special tool , that most of the so called Designers out there , don't even know it exists . Where is it ? Right - click the Eyedropper Tool , and select Ruler Tool.Once you clicked it , we have to let Photoshop know about the way we want to rotate the picture ! Draw a line with the Ruler Tool just about where the horrizontal line of the picture should be. In the example with the buildng and the woman , i'm going to draw a line where right where the building's front side begins. It's pretty hard to explain it , but it's very easy to do it. You may have to experiment a bit , just so you can understand what Photoshop is doing , and why it's doing it.

Ok ... so : you drew the line , now you have to go Image --> Rotate Canvas , and click Arbitrary . After that just click OK and you're all done. You may want to crop this photo using the Crop Tool , so the white edges are gone . To use the Crop Tool , just press the hotkey C on your keyboard.
Related Posts Plugin for WordPress, Blogger...