Se afișează postările cu eticheta Basic Editing. Afișați toate postările

duminică, 5 decembrie 2010

Photoshop Tutorial : How to correct very bright / too dark pictures

Here's a simple tutorial about correcting underexposed / overexposed pictures using Adobe Photoshop. Let's say that your camera didn't do well on your last photography session. Just open the picture you want to edit in Photoshop using CTRL + O / File --> Open . Correcting this type of photos is just a simple matter of changing the blending mode of simillar layers.

After you got the picture opened in Photoshop , you have to duplicate the background . Just drag the layer with your photo onto the Add a new layer button.
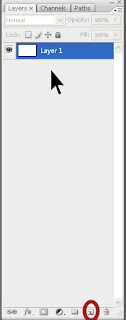
OK ! Once you've duplicated the layer with your photo , you have to know what's wrong with your photo . If it's too bright , first select the new duplicated layer you have created , go to the Blending Mode drop down menu , and select Multiply . Wow ! Awesome , right ? If it's way too dark , you have to change the blending mode from normal , to Overlay .

How do you go to the blending mode menu ? It's right on top of your Layer Menu !!
Click the next photo to see where it's located.
Here are a few examples of photos edited using this very method
( Please click the images to see them with decent quality )


Well , i hope you liked it ! See you on my next tutorial :)

Photoshop Tutorial : How to correct the orientation of a photo

This is a tutorial used to correct the orientation of your photo . So you took a few pictures , but on the photo that you liked most , the photographer rotated the camera a little bit , just enough to ruin it. Don't worry ! There's a simple way to correct this in Photoshop !

First , let me give you an example of what i am talking about :
Ok , in this tutorial , i am going to use those 2 photos you've seen few seconds ago.This is the original picture.

Open it in your Photoshop , using CTRL + O or File -> Open . After you got it in your work space , we have to use the Ruler Tool . This ia a special tool , that most of the so called Designers out there , don't even know it exists . Where is it ? Right - click the Eyedropper Tool , and select Ruler Tool.Once you clicked it , we have to let Photoshop know about the way we want to rotate the picture ! Draw a line with the Ruler Tool just about where the horrizontal line of the picture should be. In the example with the buildng and the woman , i'm going to draw a line where right where the building's front side begins. It's pretty hard to explain it , but it's very easy to do it. You may have to experiment a bit , just so you can understand what Photoshop is doing , and why it's doing it.

Ok ... so : you drew the line , now you have to go Image --> Rotate Canvas , and click Arbitrary . After that just click OK and you're all done. You may want to crop this photo using the Crop Tool , so the white edges are gone . To use the Crop Tool , just press the hotkey C on your keyboard.

duminică, 28 noiembrie 2010

Photoshop Tutorial : Godfather Effect Threshold


This is the second way to get the Godfather effect on a photo.
Basically , what you have to do is once you opened the image in photoshop , go to Image -> Adjustments -> Threshold . Play with it until you get the desired effect. After that , just paint the background black so it all blends together .
Once you're done with this :
THE GODFATHER LOGO

THE ROSE

Save them both to your computer , and open them in Photoshop.You should now have something like this :

For the rose:
Go in photoshop on the window where you have the rose , and press CTRL + A . This will select the whole image . Press CTRL + C after you selected the image , and then , go to your own picture window , and press CTRL + V to paste the rose image there . You might notice that it's not the proper size . While on the rose layer , press CTRL + T to free transform the rose . After you got it to the size you need , press enter. Go to the first tool from your Tools Bar . And move the rose till you get it in the right position.
For the Godfather logo:

Repeat the whole operation you did for the rose , and adjust the logo to the correct position.

sâmbătă, 27 noiembrie 2010

Photoshop Tutorial : How To Make Your Picture Look Better

So .. let's say you took a picture of yourself , or maybe a friend . But it's not quite the way you wanted it to be . Maybe the camera messed up the colors , or maybe you just happened to have a spot on your skin when the photo was taken. What to do ? Open your image in Photoshop , and follow my lead !
First , you have to get your skin allright.Click the Spot Healing Brush Tool in your Tools Bar.


After you've done that , change the size so it'll be just about the size of the spot on your skin. Press once on the spot you want to remove , and you'll see that Photoshop magically removes it from your face. Repeat this for all the noticeable spots that make you uncomfortable . After you're done , you'll notice that the picture really improved ! But wait , that's not all !

Now , maybe you're still not 100% happy with this photo. What you want to do is , click Image -> Adjustments -> Brightness/Contrast .
When you're there try to play a little with the 2 options untill you see improvement on your picture.
Now you're really happy with it ... maybe you'll post it to your facebook account .. Hold on ! There's more !
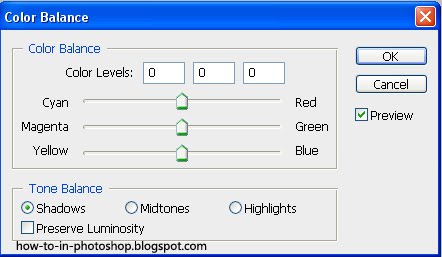
Again , go to Image -> Adjustments and then , click Color Balance


Again , play with the options until you're satisfied . When you're done , try to change from Midtones to Shadows and then , to Highlights !

When you're done , you'll have a nice , cool looking picture , that you can be proud of ! Go ahead and post that piece of art on your facebook account. Thanks for reading , and see you on the next tutorial.

marți, 8 iunie 2010

Photoshop Tutorial : Editing and replacing parts of a photo

Here's a cool tutorial for all you newbies out there :
First , let's open this nice apple i found on the net . Right click it and save it somewhere you can remember on your computer.
How do you open it in Photoshop ?
Just double click the photoshop icon , and once it's done loading and you're in the menu. Just do like i do :
Browse till you find the image , and click Open .
Now that you have it in your Photoshop space , right-click the fourth icon down on your tool bar and after that , left click the Magic Wand . After, just left click once the white space on the photo ( the white background of the apple ).
Once it's selected you can either drag new images from your Photoshop space on that one , and they will appear only on your selection , or you can use the Brush Tool to paint that area . It's all up to your imagination.
Related Posts Plugin for WordPress, Blogger...