marți, 30 noiembrie 2010

Photoshop Tutorial : How to install Custom Shapes in Adobe Photoshop

Here's a small tutorial on how do it : ( Also , don't forget to click each image to zoom it )

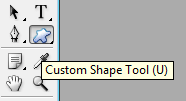
First , you have to click on the Custom Shape Tool , or press the Hotkey (U) on your keyboard. If it's not there , try to right click the icon in that spot , and after that , left click the Custom Shape Tool.


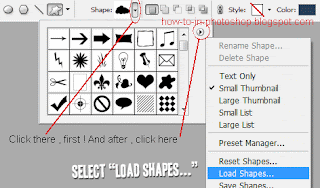
After this , what you want to do , is click on the small arrow pointed downward at the top ! After that click on the arrow right pointed small black arrow to go to the Custom Shapes options.Once you're there just press Load Shapes... and go to your custom shapes file and press OK.

Photoshop Tutorial : How to install a brush file .abr or .png in Adobe Photoshop

So , the first step is to get the actual brush file . They are usually named something.abr but , they can also be something.png . Here is how they look .


So , you got the brush file , ha ? Good , now you have to install it . Copy the brush file into your Adobe Photoshop\Presets\Brushes folder. This path depends on where you installed Photoshop. So , if you , for example didn't change the default pathway , it should be something like C:\Program Files\Adobe\Adobe Photoshop X\Presets\Brushes ( X is your Adobe Photoshop version , for example CS3 ). Anyhow , you should manage to copy the .abr file in your Photoshop's Brushes folder .

After that you just have to do as i do in the following images. First , select the brush and click on the little black arrow pointed downwards , next to where it shows you the shape and size of the brush.
Also , don't forget to click on each picture , if you want to zoom it.


After you've clicked there , click to the next small arrow , to activate the brush files options.


After you're in the small menu over there , click Load Brushes... .


After that , just navigate to your .abr / .png brush file , and click OK/Confirm.

duminică, 28 noiembrie 2010

Photoshop Tutorial : Godfather Effect Threshold


This is the second way to get the Godfather effect on a photo.
Basically , what you have to do is once you opened the image in photoshop , go to Image -> Adjustments -> Threshold . Play with it until you get the desired effect. After that , just paint the background black so it all blends together .
Once you're done with this :
THE GODFATHER LOGO

THE ROSE

Save them both to your computer , and open them in Photoshop.You should now have something like this :

For the rose:
Go in photoshop on the window where you have the rose , and press CTRL + A . This will select the whole image . Press CTRL + C after you selected the image , and then , go to your own picture window , and press CTRL + V to paste the rose image there . You might notice that it's not the proper size . While on the rose layer , press CTRL + T to free transform the rose . After you got it to the size you need , press enter. Go to the first tool from your Tools Bar . And move the rose till you get it in the right position.
For the Godfather logo:

Repeat the whole operation you did for the rose , and adjust the logo to the correct position.

Photoshop Tutorial : How to Godfather Effect / Poster


Here's how the actual Godfather movie poster looks :
Cool , right ? I'm going to teach you how to get the same effect on a photo of you.We're gonna use an image that i found on google for this test :

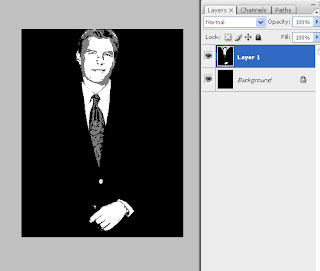
Save it to your computer , and open it in Photoshop , unless you already have your own photo in a suit that you wish to convert into a Godfather poster. Once you got it , use one of the many tools to select the outline of your silhouette , so you can select the subject.Here's how it should look. It doesn't have to be that perfect , but , at least try to make it convincing , at least the head.
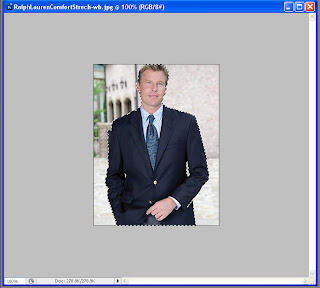
Ok , so once you have a proper selection on your subject , right click the subject , and press Layer via cut . What this does , it splits the existing layer into the part that you selected and all the parts that remain. Now , click the layer with your subject. And do the following :
First , you have to make the subject black and white . To do this , while you're on the subject layer , go to Image -> Adjustments -> Hue/Saturation , and turn the Saturation all the way down to -100 . Click OK . Now we have to add a little bit of contrast to our subject . Go to Image -> Adjustments -> Brightness/Contrast , and pump up just a little bit the Contrast. Now , the most important part : Go to Image -> Adjustments -> Posterize . Try to adjust it while keeping an eye on the Godfather poster , to see what works a best . It's usually a low value between 2-3 and 5-6. I think 3 works best in my case. After you've done playing with it , press OK. You should now , have something close to this :
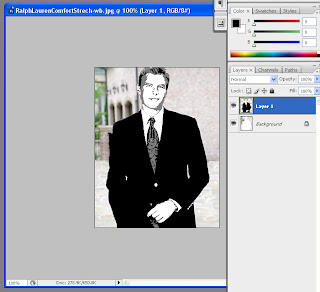
Now , change to the background layer , and get a big size for the Brush , and paint it all black , so that the subject and the black background kinda' blend in together. Don't worry if there are still some dots left . You can remove those by selecting back the layer with your subject and closely , with a medium sized black Brush , paint the outlines of your subject so it can really blend in with the black background . If you don't like the shades of the subject , click the layer with the guy , go to Image -> Adjustments -> Brightness/Contrast and feel free to play with the settings until you get the desired effect.

For the next part you need 2 more images.

THE GODFATHER LOGO

THE ROSE
Save them both to your computer , and open them in Photoshop.You should now have something like this :
For the rose:
Go in photoshop on the window where you have the rose , and press CTRL + A . This will select the whole image . Press CTRL + C after you selected the image , and then , go to your own picture window , and press CTRL + V to paste the rose image there . You might notice that it's not the proper size . While on the rose layer , press CTRL + T to free transform the rose . After you got it to the size you need , press enter. Go to the first tool from your Tools Bar . And move the rose till you get it in the right position. For the Godfather logo:
Repeat the whole operation you did for the rose , and adjust the logo to the correct position.

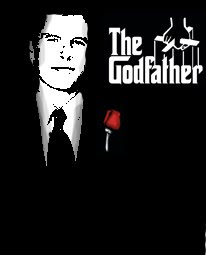
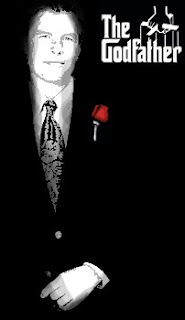
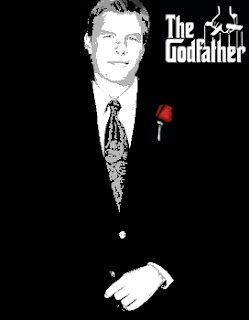
Here's the final result . This whole operation can be done in less than 2 minutes , so it's really no big deal. If you want a more detailed look , well , you have to spend more times correcting and polishing the details .
sâmbătă, 27 noiembrie 2010

Photoshop Tutorial : How To Make Your Picture Look Better

So .. let's say you took a picture of yourself , or maybe a friend . But it's not quite the way you wanted it to be . Maybe the camera messed up the colors , or maybe you just happened to have a spot on your skin when the photo was taken. What to do ? Open your image in Photoshop , and follow my lead !
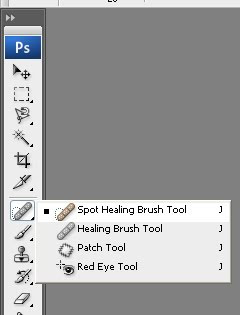
First , you have to get your skin allright.Click the Spot Healing Brush Tool in your Tools Bar.


After you've done that , change the size so it'll be just about the size of the spot on your skin. Press once on the spot you want to remove , and you'll see that Photoshop magically removes it from your face. Repeat this for all the noticeable spots that make you uncomfortable . After you're done , you'll notice that the picture really improved ! But wait , that's not all !

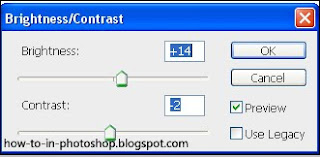
Now , maybe you're still not 100% happy with this photo. What you want to do is , click Image -> Adjustments -> Brightness/Contrast .
When you're there try to play a little with the 2 options untill you see improvement on your picture.
Now you're really happy with it ... maybe you'll post it to your facebook account .. Hold on ! There's more !
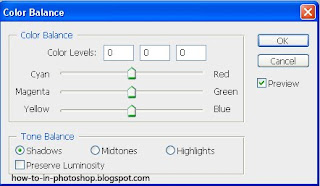
Again , go to Image -> Adjustments and then , click Color Balance


Again , play with the options until you're satisfied . When you're done , try to change from Midtones to Shadows and then , to Highlights !

When you're done , you'll have a nice , cool looking picture , that you can be proud of ! Go ahead and post that piece of art on your facebook account. Thanks for reading , and see you on the next tutorial.

Photoshop Tutorial : Duplicating a Layer

How to duplicate a layer ?
Here is a mini-tutorial that will help you understand and work with layers.
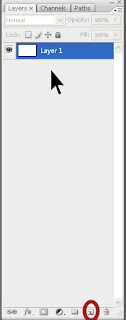
To duplicate a layer , first we need an actual layer. Then , we have to left click and drag the layer we want to duplicate , all the way down in the layer menu , to the "Add a new layer" Button.Take a close look in the following image.

click this image to zoomSo , you have to left click the layer you want to duplicate , and then , drag it all the way down to the marked button i showed you before , that says "Add a new layer" , and then , release the left click when your cursor is pointing that icon.That's it ! That's how easy it is. Thanks for reading see you on my next tutorial !

Photoshop Tutorial : Working with Layers

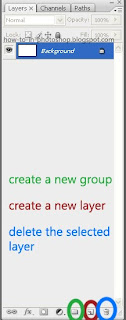
First , we're gonna learn how to do a simple layer.We do that by clicking the Create a new Layer button on the bottom right corner.It's the one next to the "Bin" icon.
On it's right side there's the Bin-looking icon . That's the button we use to DELETE .
And , on it's left side there's the button that looks like a folder . We use that one to Create a new Group.We can drag layers into that group just to organise our workspace.

Up next , i made a small scheme that will help you to find the buttons.

Click to zoom

Photoshop Tutorial : Colorize and Retouch an Photo

Let's start out by saving and opening this following actress's photo. (Naomi Watts)

Duplicate this layer.If you don't know how to do that , check my previous tutorial on How to duplicate a layer.Once you duplicated this layer , you need to go to the menu and click Filter , after that go to Noise , and after , Median . Once you're there enter a value of about 3 pixels .

Once you're done there , go to Filter --> Blur , and press Gaussian Blur .

Create a Layer Mask . Go to Layers --> Layer Mask --> Reveal All. Fill it with black. After that pick a soft brush and paint with white , also changing the opacity white painting , all the skin .Don't go over the face lines , so you can have a neat , professional looking image.Do NOT blur the eyes , the hair or mess up the lips.


click this image to zoom

Now , press CTRL + M to add an Curves Adjustment. You will notice that you can change the settings from RGB to Red , Green , or Blue . Adjust each of them using the following settings :

Now , add a Selective Color adjustment layer with the following settings then fill its mask with black.

Reds: -55 0 0 0
Neutrals: -20 +15 –40 +5

Now , try to paint with white over the lips and you will notice they’ll turn a light pink. Make sure you follow the edges of the lips properly for a professional effect.

Once again , add another Selective Color adjustment layer with these settings:

Yellows: -100 0 0 0
Whites: 0 0 0 –25
Neutrals: +20 –10 –50 +8

Fill its mask with black and carefully paint with white over the eyes like you did with the lips.

Now that you're done with that , go to Layer --> Flatten Image, then to Filter --> Sharpen --> Smart Sharpen and use the settings from this picture:


Now that you're done , take a look on the effect you have just added ! Voila !


Pretty cool , right ? Thanks for reading , and see you on the next tutorial !
Related Posts Plugin for WordPress, Blogger...