


Here's how the actual Godfather movie poster looks :
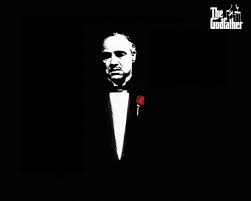
Cool , right ? I'm going to teach you how to get the same effect on a photo of you.We're gonna use an image that i found on google for this test :

Save it to your computer , and open it in Photoshop , unless you already have your own photo in a suit that you wish to convert into a Godfather poster. Once you got it , use one of the many tools to select the outline of your silhouette , so you can select the subject.Here's how it should look. It doesn't have to be that perfect , but , at least try to make it convincing , at least the head.
 Ok , so once you have a proper selection on your subject , right click the subject , and press Layer via cut . What this does , it splits the existing layer into the part that you selected and all the parts that remain. Now , click the layer with your subject. And do the following :
First , you have to make the subject black and white . To do this , while you're on the subject layer , go to Image -> Adjustments -> Hue/Saturation , and turn the Saturation all the way down to -100 . Click OK . Now we have to add a little bit of contrast to our subject . Go to Image -> Adjustments -> Brightness/Contrast , and pump up just a little bit the Contrast. Now , the most important part : Go to Image -> Adjustments -> Posterize . Try to adjust it while keeping an eye on the Godfather poster , to see what works a best . It's usually a low value between 2-3 and 5-6. I think 3 works best in my case. After you've done playing with it , press OK. You should now , have something close to this :
 Now , change to the background layer , and get a big size for the Brush , and paint it all black , so that the subject and the black background kinda' blend in together. Don't worry if there are still some dots left . You can remove those by selecting back the layer with your subject and closely , with a medium sized black Brush , paint the outlines of your subject so it can really blend in with the black background . If you don't like the shades of the subject , click the layer with the guy , go to Image -> Adjustments -> Brightness/Contrast and feel free to play with the settings until you get the desired effect.
For the next part you need 2 more images.
THE GODFATHER LOGO
THE ROSE

Save them both to your computer , and open them in Photoshop.You should now have something like this :

For the rose:
Go in photoshop on the window where you have the rose , and press CTRL + A . This will select the whole image . Press CTRL + C after you selected the image , and then , go to your own picture window , and press CTRL + V to paste the rose image there . You might notice that it's not the proper size . While on the rose layer , press CTRL + T to free transform the rose . After you got it to the size you need , press enter. Go to the first tool from your Tools Bar . And move the rose till you get it in the right position. For the Godfather logo:
Repeat the whole operation you did for the rose , and adjust the logo to the correct position.
Here's the final result . This whole operation can be done in less than 2 minutes , so it's really no big deal. If you want a more detailed look , well , you have to spend more times correcting and polishing the details .


0 comentarii:
Trimiteți un comentariu